
Search on screenshot attachments
OCR on picture attachments with Google vision API

OCR on attachment with Google vision API
This article shows how to use the Google Vision API to extract text from attachments and to make this text searchable in Service-Now.
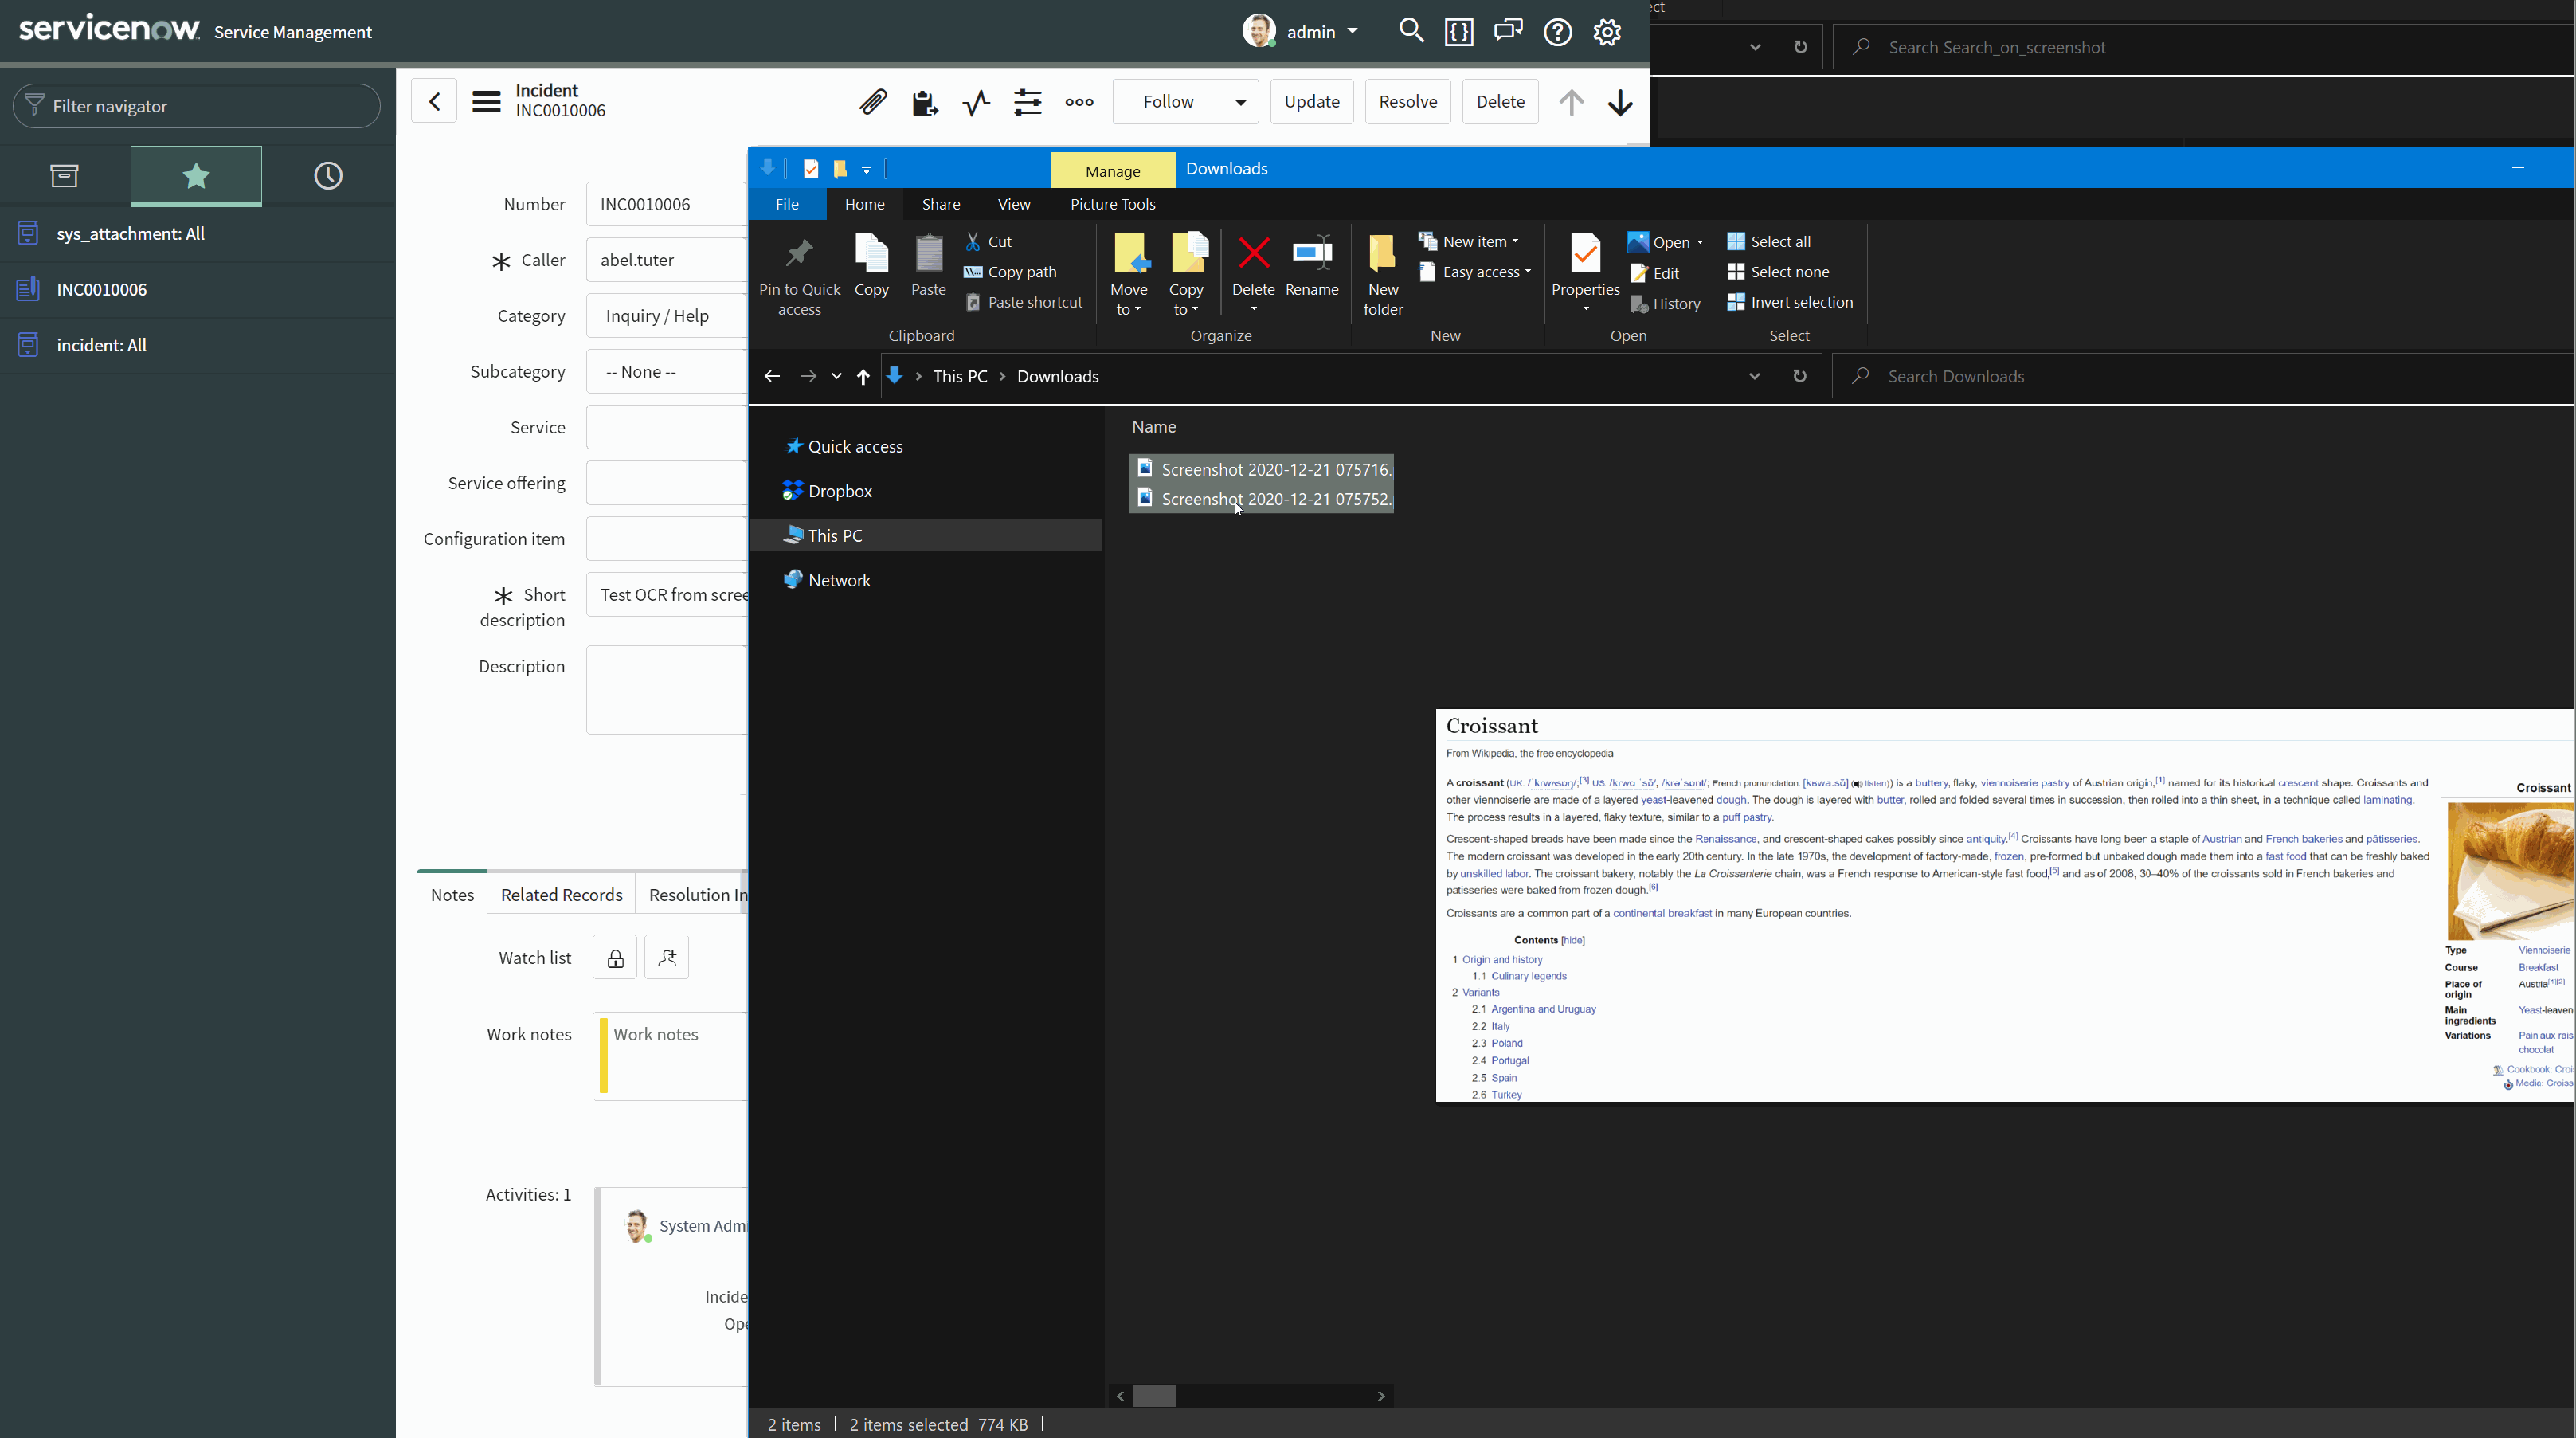
In this quick demo, we can see that attaching printscreens to an incident will trigger a call to the Google Vision API and extract the text in a field Extracted field on the attachment table and consolidate all the attachment texts in a field Attachment text on the incident.
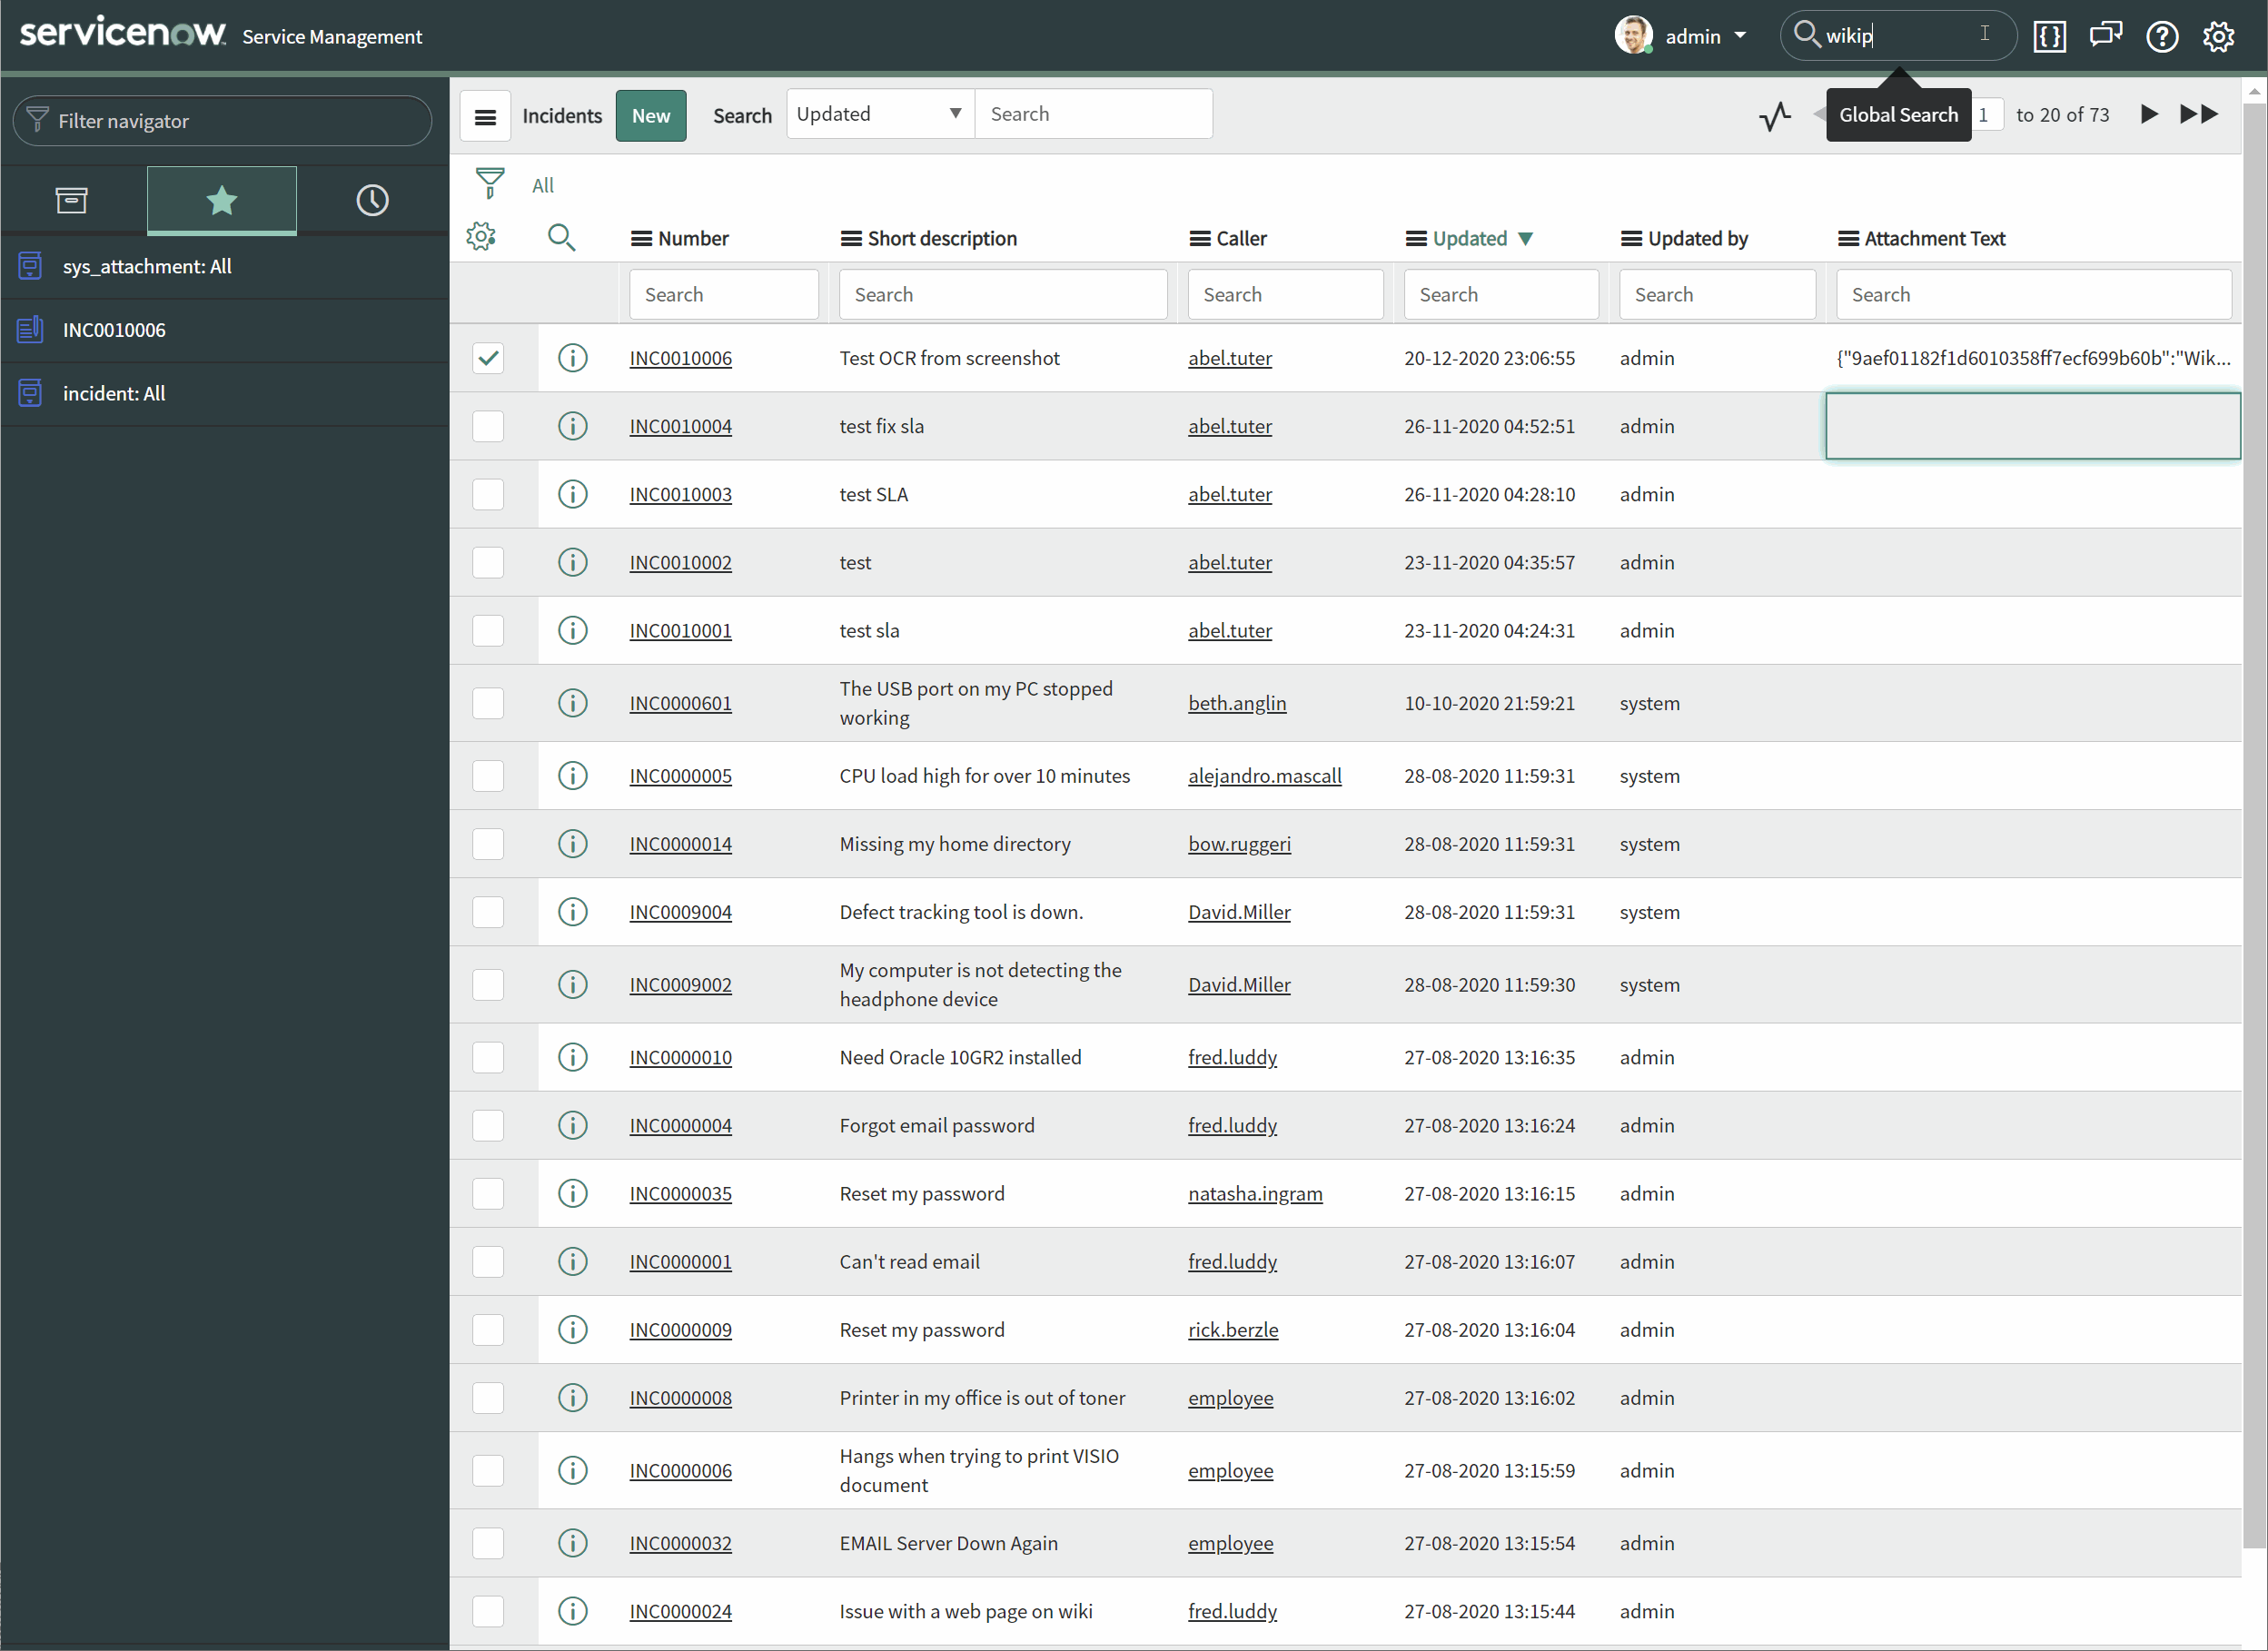
Then we can search string that are present only on the screenshots, like “Wikipedia” or “Croissant” in this case.
Now, let’s see how to implement this solution.
Setup the google APi
First of all, you will need a Google Cloud account.
If you don’t already have a Google Cloud account, you can setup your account here: https://cloud.google.com/
When done, go in the Google Cloud console and follow the instruction in the starting guide[1] and in the Detect text in images guide[2].
Basically you will need to:
- create a new Project
- activate the Vision API for your project
- Create an API key in the credential
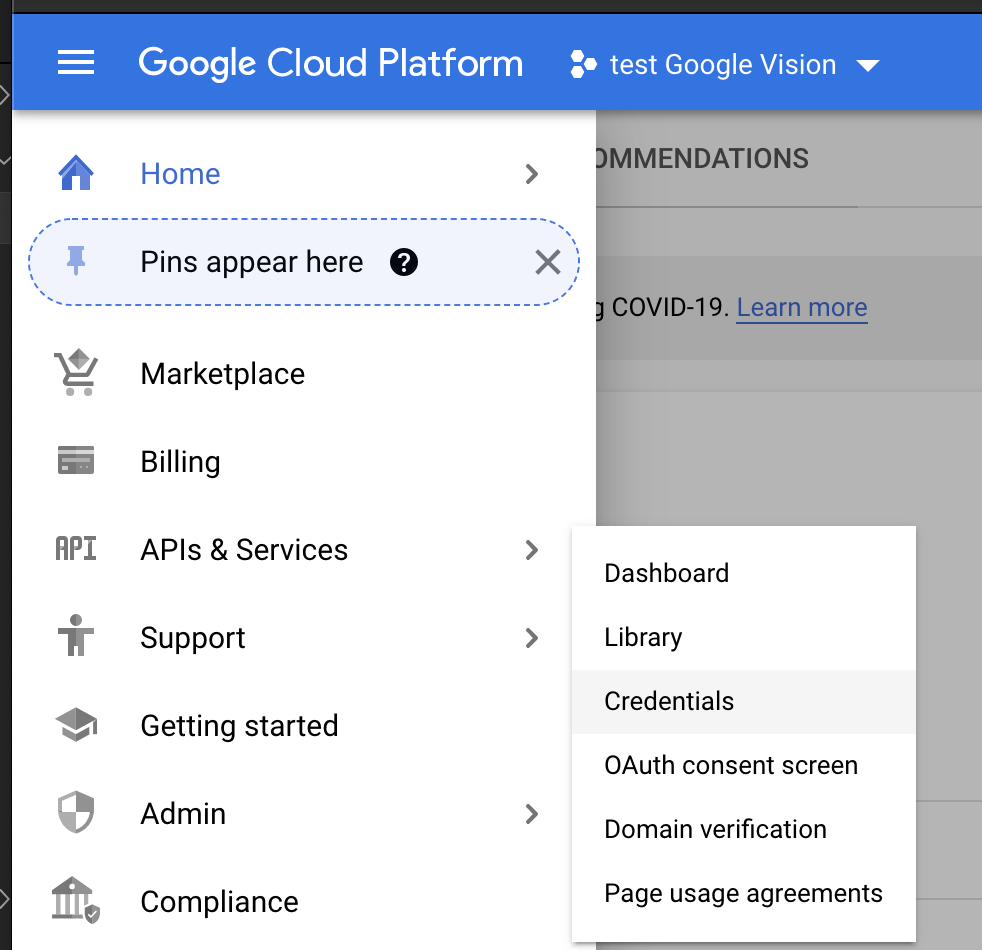
- Go in the menu, the “API & Services” - “Credentials”
 Create API credentials
 - Then click “Create Credential” - “API key”
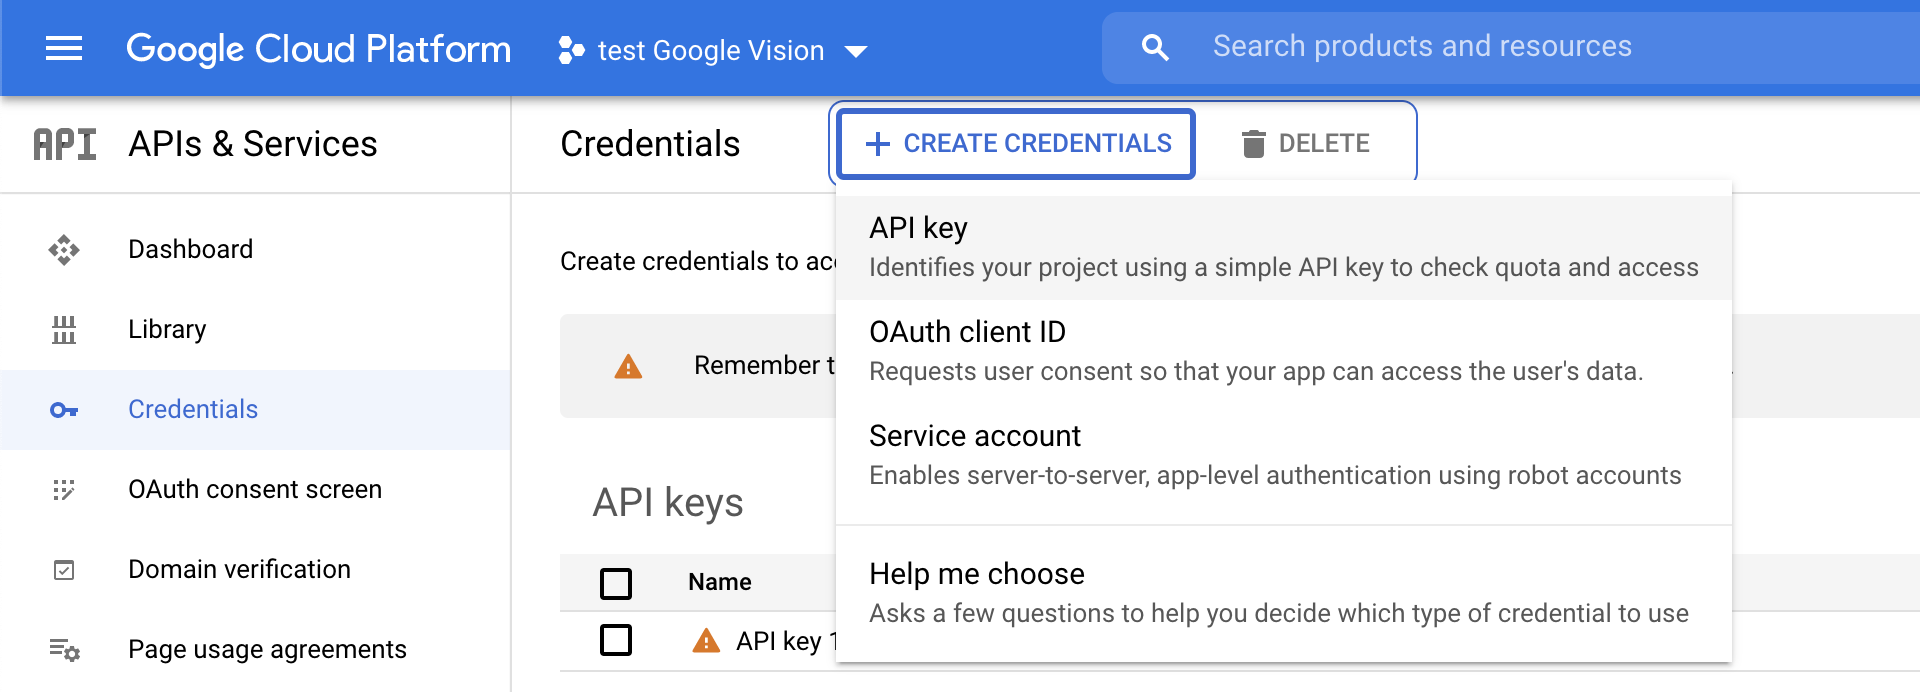 Create API credentials
 - Then copy and keep the key for later reference.
- Go in the menu, the “API & Services” - “Credentials”
You should now be ready to use the google API.
Obviously, for real life usage, you may want to use other authentification methods and/or add some more security. To do so please refer to the Google Cloud documentation or consult a Google Cloud specialist.
Adapt the attachment table
The idea is to store the extracted text from the image in a text field on the attachment table.
Before doing so, I suggest to work in an Scoped Application: so please create and use a new Application “OCR Attachment”.
Then, let’s create a new field u_extracted_text on the table sys_attachment, of type String and of a sufficient size of 4000.
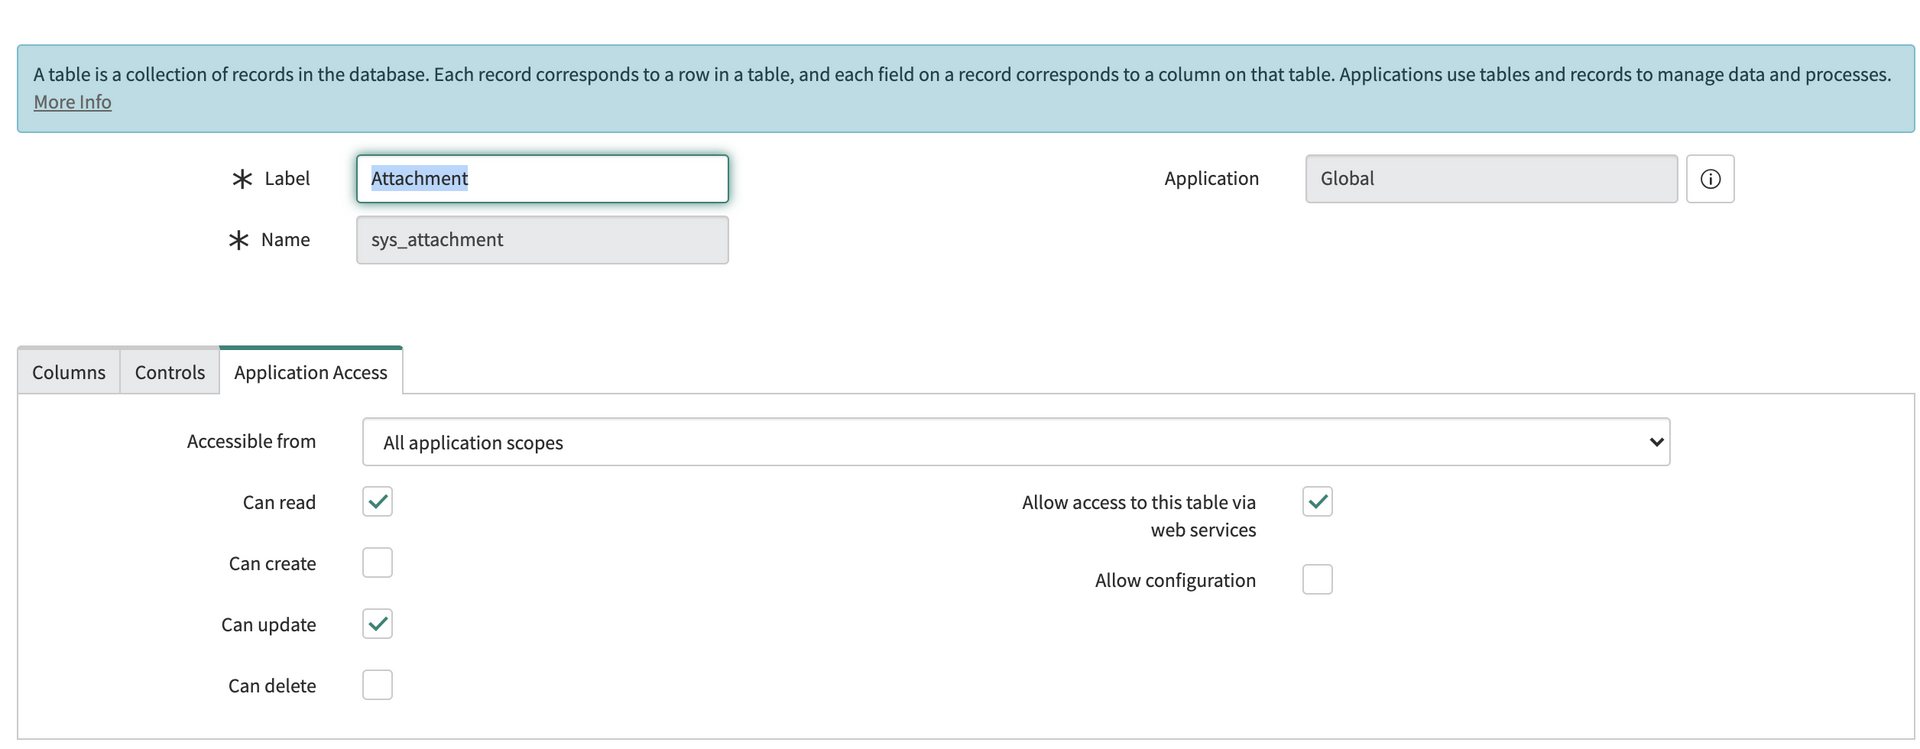
Then we need give access at our application “OCR Attachment” to the Attachment table:
- go in “System Definition” - “Tables”
- select the sys_attachment table
- on the “Application Access” tab set “Can Update” to true.
 Create API credentials
 - To avoid potential issues later, please also reset the cache by doing a
cache.doin the Filter Navigator.
Create the REST message
Now we need to create a REST message and the corresponding HTTP method.
Simply create a new REST message “Google Vision API” and set the endpoint to
https://vision.googleapis.com/v1/images:annotate
Then open the prefefined HTTP method that is automatically created when saving the REST message and
- renamne it to “POST”
- Set the HTTP method to “POST”
- Set the endpoint to
https://vision.googleapis.com/v1/images:annotate?key=${apikey} - On the “HTTP request” tab, set the Content to
{
   "requests":[
      {
         "image":{
            "content":"${base64Image}"
         },
         "features":[
            {
               "type":"TEXT_DETECTION"
            }
         ]
      }
   ]
}
The important points are the variable names apikey and base64Image, that we will use in the Business Rule later.
Testing the rest message
To test you REST message and HTTP request, you can add 2 entries in the Variable Substitution related list:
- apikey: containing the API you created before in the Google Cloud console
- base64Image: containing a base64 encoded image that have text in it.
- You can use this online base64 converter to convert your image.
Then you can use the test related link and you should get a code 200 and a json string with the text extracted from your image.
Create a Business Rule on the attachment table
Now that both the table and the REST message are ready, we can create a new Business Rule:
- Name : “Extract text from image”
- Table: sys_attachment
- Advanced: true
- When to Run
- When: async
- On insert
- Condition: Extracted Text is Empty and File name ends with .jpg, .jpeg or .png (adapt the list to your taste)
The in the Advanced tab, you can use and adapt the following code:
(function executeRule(current, previous /*null when async*/) {


	try {
		// get base64 string from file
		var base64Str = new GlideSysAttachment().getContentBase64(current);

		// get API key
		var apiKey = gs.getProperty('x_12270_ocr_attach.googleVision_api_key');

		if (base64Str && apiKey){
			// build request
			var request= new sn_ws.RESTMessageV2('x_12270_ocr_attach.Google Vision API', 'POST');
			request.setStringParameterNoEscape('base64Image', base64Str);
			request.setStringParameterNoEscape('apikey', apiKey);

			// execute request
			var response = request.execute();

			// extract response
			var responseBody = response.getBody();
			var httpStatus = response.getStatusCode();
			// if success
			if (httpStatus == '200'){
				responseObj = JSON.parse(responseBody);
				if (responseObj && responseObj.responses[0] && responseObj.responses[0].fullTextAnnotation){
					var text = responseObj.responses[0].fullTextAnnotation.text;
					if (text){
						current.u_extracted_text = text.toString();
						current.update();
					}
				}
			}
		}


	} catch (exception){
		gs.error("Error in Business rule 'Extract text from image': " + JSON.stringify(exception));
	}


})(current, previous);
Then the last step is to create a new system property googleVision_api_key and set there the API key you created from the Google Cloud Console.
Searching tasks using attachment’s text
Now the last part is to be able to search records (like incidents, etc.. ) where the related attachment contains the searched text.
The easiest way for this is to create a new field on the Task table that will contains the extracted text of all the attachments. This way the text contained in this field (the text extracted from the attachments) will be included in the Zing search on tasks.
So, let’s create a new field attachment_text on the table task, of type String and of a sufficient size of 4000.
Then we need a new Business Rule on the table sys_attachment:
- Name : “Maintain extracted text on related task”
- Table: sys_attachment
- Advanced: true
- When to Run
- When: after
- On insert, update, delete
- Condition: Extracted Text changes
- Conditions:
new GlideTableHierarchy(current.table_name).getRoot() == "task" /*check that the related table is child of task*/
The in the Advanced tab, add the following code:
(function executeRule(current, previous /*null when async*/) {
	try{
		// get the related table
		var taskGr = new GlideRecord(current.table_name);
		if (taskGr.get(current.table_sys_id)){
			// to hold the attachment texts
			var attachmentTextObj = {};
			// make sure the attachment text field is valid
			if (taskGr.isValidField('x_12270_ocr_attach_attachment_text')){ /*ADAPT according you Application mame, etc...*/
				// if the attachment text field exist and is not empty, parse it
				if (taskGr.x_12270_ocr_attach_attachment_text){ /*ADAPT according you Application mame, etc...*/
					attachmentTextObj = JSON.parse(taskGr.x_12270_ocr_attach_attachment_text); /*ADAPT according you Application mame, etc...*/
				}
				// if we delete the attachment, remove the corresponding text
				if (current.operation() == 'delete') {
					delete attachmentTextObj[current.getUniqueValue()];
				} else /*otherwise, set the text*/ {
					attachmentTextObj[current.getUniqueValue()] = current.u_extracted_text.toString();
				}
				// Set back the attachment text to string and update
				taskGr.x_12270_ocr_attach_attachment_text = JSON.stringify(attachmentTextObj); /*ADAPT according you Application mame, etc...*/
				taskGr.update();
			}
		}
	} catch (exception){
		gs.error("Error in Business rule 'Maintain extracted text on related task': " + JSON.stringify(exception));
	}
})(current, previous);
Testing
You can now take a print screen with text in it and attach it to a record like an Incident:
- The
sys_attachmentrecord now have the text extracted in to theExtracted textfield. - The
incident recordrecord now have also the text in theattachment_textfield.
You can now search for a String that is present on the screenshot and you incident should show up in the search result
## reference [1] Cloud Vision API - Documentation - Quickstart: Setup the Vision API https://cloud.google.com/vision/docs/setup [2] Cloud Vision API - Documentation - Detect text in images https://cloud.google.com/vision/docs/ocr


Comments powered by Talkyard.